Monday, December 22, 2014

Christmas Cards and left over Turkey

Got totally snowed in this year!
That's NY winter for you.

I discovered that making turkey soup with the holiday leftovers...

is MAD better with a few splashes of blackberry merlot in it!!
Bet you didn't see that coming ;)

I almost always make my own Christmas Cards. This year they look like presents! I used sparkly wrapping paper and glued some ribbons and a gift tag on to a card form I made out of cardstock.


Santa kitty made a debut appearance!

Saturday, December 20, 2014

Easy DIY Christmas Decorations with Garland

Here are some easy DIY Christmas decorations!
The tree is just a Styrofoam cone (but you could use poster board shaped into a cone) wrapped with garland and the ends were secured by tucking them in so I can unwrap it after Christmas and decorate it differently for another holiday. No sense in having a million cones in my basement between holidays, right?
This is a great idea for those of us who aren't professional wreath makers!
I grabbed an old picture frame (mine happened to have cross bars that look like window panes!) and wrapped it with garland. It hangs cheerfully on my front door. You could even put a winter scene behind it so it does look like a window!

Monday, December 15, 2014

Santa Bottles. DIY Recycle Craft for Christmas!

Aren't These great?!
Use them as vases, centerpieces, or even gifts!
Finally a use for all those accumulating wine bottles from my parties :)
I removed the labels first by soaking in hot water with some dish soap.
Once they are completely dry, you can spray paint them red. When that is dry, I taped off the outer lines of the belt and painted with black acrylic paint.
The buckles are some adhesive rhinestones that I found at Michaels for $1!!


Tuesday, October 21, 2014

DIY Furniture Polish that makes Scratches Disappear Like Magic!!!

DIY furniture polish removes scratches
These chairs started out pretty rough looking.

DIY furniture polish that removes scratches
But with a few things from the cupboard, they were shiny and lovely again!

DIY furniture polish that removes scratches
I mixed 3 parts vegetable oil (or olive oil) with 1 part vinegar (white or cider vinegar works). So depending on how much you need, you could do 3/4cp oil to 1/4cp vinegar and keep it in a labeled container for next time!

DIY furniture polish that removes scratches
Just grab a rag, dip it in the polish, and rub it in to the wood. The scratches disappear like magic in front of your very eyes!! It's that easy ( and not to mention cheap). The polish is great for wood thanks to the oil that gives the wood moisture and helps prevent cracks/ splits. You can use this polish as frequently as you like and there are no harsh chemicals. It's all natural!

Friday, July 18, 2014

Make your own Minions!

But first, look at what I grew!!! The first rose on my rosebush this year!

Toilet paper roll minions
Ok, now to the business of minion making.
All you need is a toilet paper roll, construction paper, scissors, a black marker, and glue.
Cover the roll in yellow paper (use glue to attach it, but you knew that!).

Toilet paper roll minions
Cut out this shape long enough to wrap all the way around the roll. Use blue paper so it looks like jeans.

Toilet paper roll minions
Glue on the clothes and draw on a face and pockets.

Toilet paper roll minions
Oh my gosh! but isn't he cute?!
You could make a little army of these guys!

Monday, May 12, 2014

Garden Time!!

This is my favorite time of year. Time to get planting! But first, it's time to spruce up the gear.
I painted this plant stand in checks with some black and white Indoor/Outdoor acrylic paints.

Then it was time to do something about those BORING planters.

Welcome to fairy land!


Gaston! why are you always sleeping when there's work to be done?!


Friday, April 18, 2014

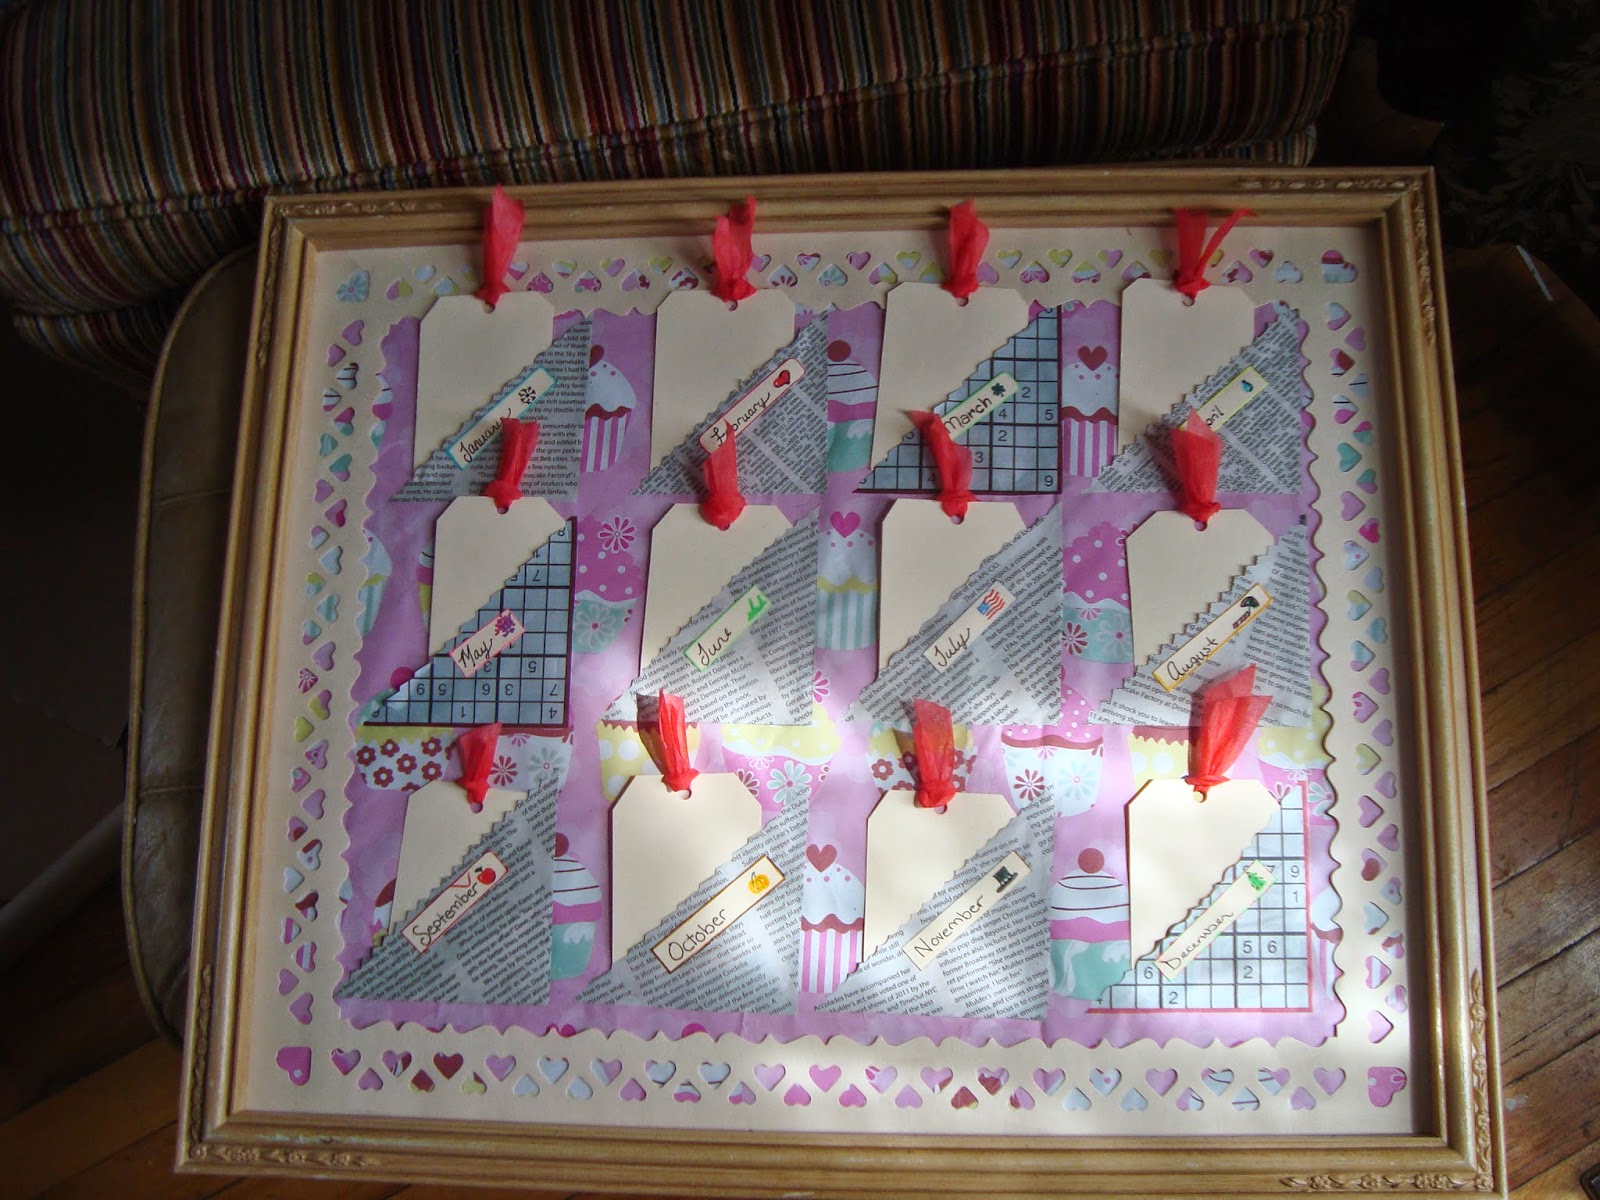
DIY Birthday Board ~Never forget a Birthday!

Found this fantastic frame at the Flea Market and knew I could use it for something! It even came with that pretty heart border~ what a steal!

I go gaga over details like this!

So I took everything out of the frame. The picture was on a piece of cardboard that I covered with some wrapping paper.

Now to use my other flea market find...decorative edge scissors (all four for $2!!!). Next, I cut out 6 squares 4"x4" ( I determined the size by the dimensions of my frame with the heart border in place, 16x12. Before cutting, figure out what size yours should be and how you want them positioned, etc). I used the decorative shears to cut each square in half diagonally.

Then I positioned them on the board like pockets and put glue just along the two edges ( the horizontal and the vertical edges). This way they are open on the diagonal so you can use it as a pocket!

Now for some tags! I cut my tags out of cardstock using a ruler as a straight edge (well, and to measure too). My tags are 2.5"x3.5". Punch holes in the tops and tie a cute ribbon through each one.

The tags fit in to the pockets. Each  pocket is a month of the year, so label the days on the tags and write in the birthdays of your loved ones.


Oh! I almost forgot! Make little cute labels for each month and glue onto the corresponding pocket. I used leftovers pieces of cardstock from making the tags and some markers.

Saturday, March 29, 2014

Latest Projects- Home Decor

I'm pretty proud of this one! Found a way to disguise my bookshelf! I used lace curtains for the first layer so I can still get  into the book shelf part. The top layer is an old sheet that I draped over it and then cut straight up the center. I made some bows out of scrap fabric and lace then used them to secure the slit open, sewing them in place where I wanted the parting.

Found this tray at a garage sale. Thought I'd freshen it up with some paint.

I think I will use some stamps to put a pattern on it. Or I could decoupage it...Or it does look nice like this too..
Decisions, Decisions!

Related Posts Plugin for WordPress, Blogger...