Thursday, December 27, 2012

Make your Own Giftbags!

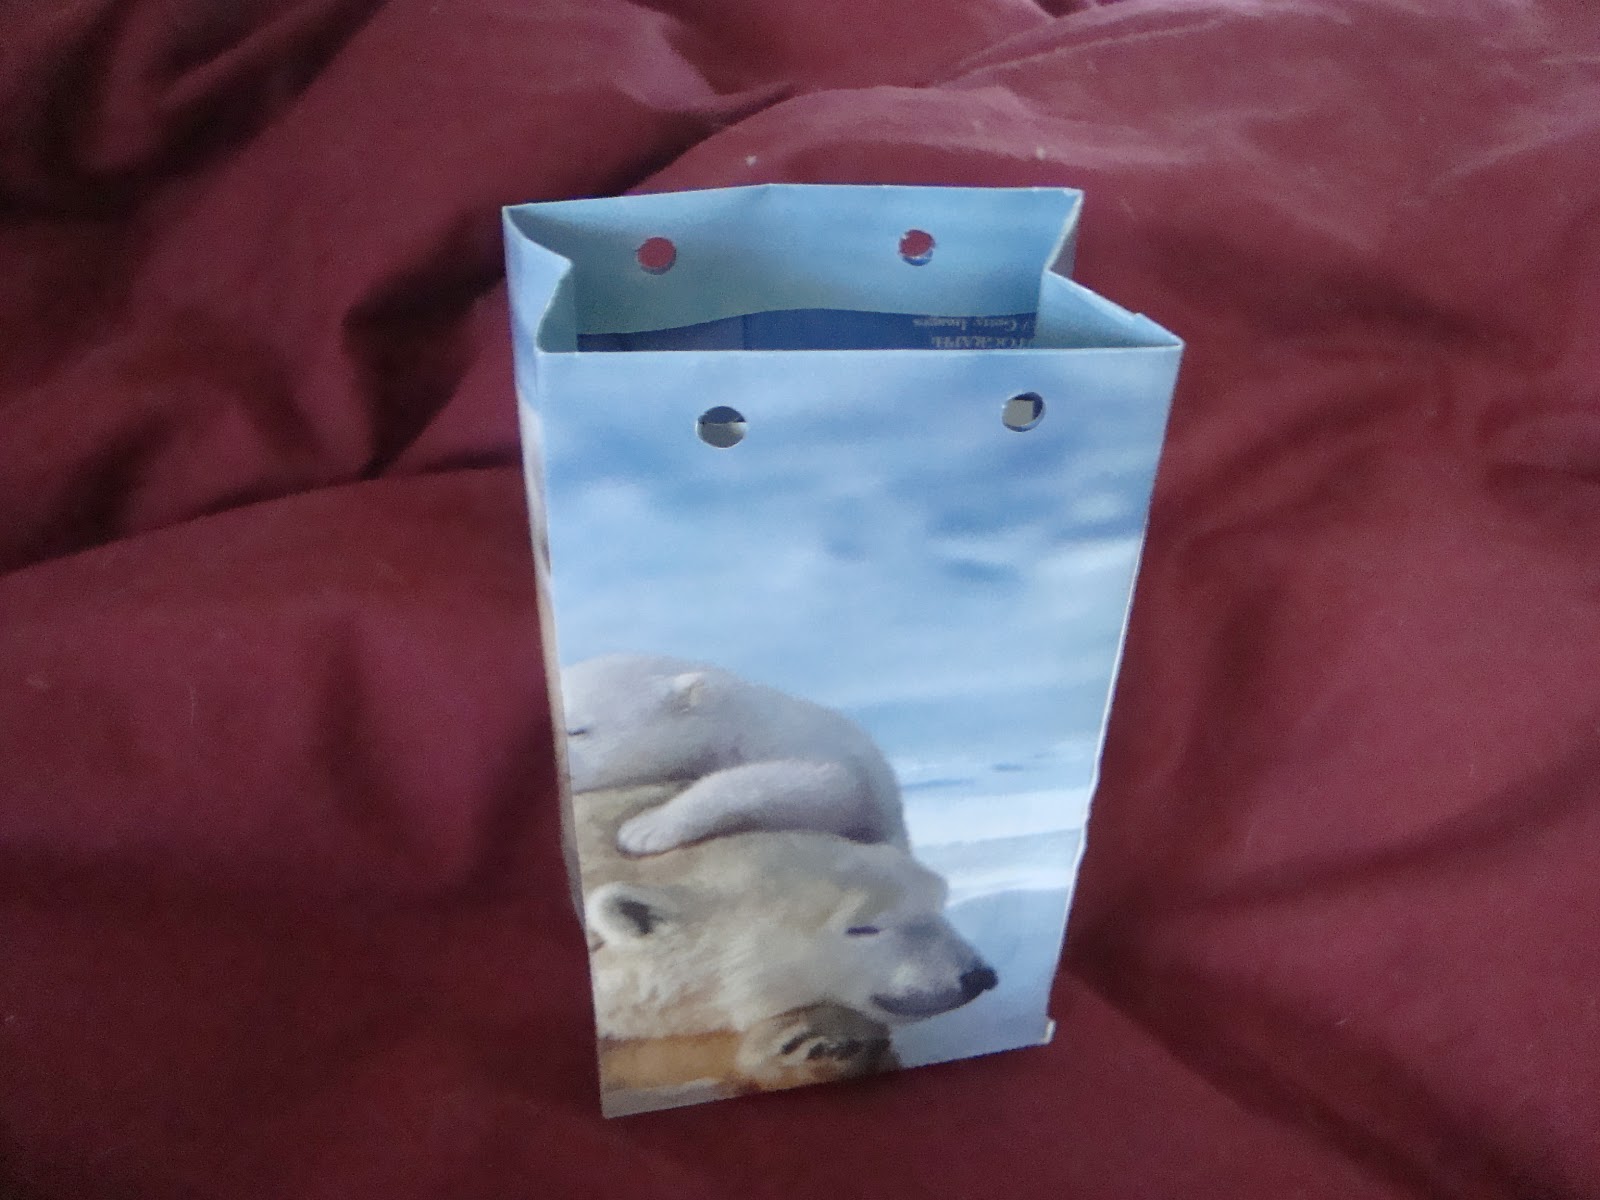
Here's a purposeful repurpose for old calendars with beautiful pictures. Make them into gift bags for Christmas, birthdays, and other gift giving occasions!

I made a pattern that can be adjusted for the size of your calendar page.
Just draw it out on scrap paper first to make sure all the measurements work then cut out on the solid lines and crease on the dotted ones.

You'll want to fold the top section down first. Then glue the side flap so you have a rectangle.
Next, glue the bottom flaps to each other with the bottom side flaps tucked inside the bag.

Then, you'll need to punch two sets of holes in the top flap that was folded over in the first step.

I used shoelaces to make the handles but you can use whatever you like (yarn, cord, etc).
 Just tie the end like starting to tie shoes and string the rest through and knot the other end.
Try to make sure the handles are the same length.

This bag was pretty small but if you use more than one page and alter the pattern, you can make larger bags too!

Mike's Christmas coasters I made getting some use already!

There will be more Christmas posts to come including eggnog for breakfast recipes!!

Tuesday, November 27, 2012

Pumpkins, oh my!

 Oh my! is right! It's been awhile since the last post. I've been so very busy. In fact, I just returned from a trip to the west coast.

We had a lot of fun with pumpkins this past month, though, and here are some examples. Maybe you will get some inspiration for next year.
Here are the results of our pumpkin carvings. For my first ever pumpkin carving I cut out Tinkerbell and the other pumpkin is apparently up for interpretation. lol. Some folks think it's ET and others say Wallace and Grommit (neither of which are correct but who's to say?) What do you think it is?
Not sure if these count as pumpkins but since it was warm enough to cookout this year at Halloween, we dressed up our burgers. They were getting jealous of all our costumes!
And I had fun making delicious pumpkin cinnamon rolls from scratch.
What's your favorite pumpkin yum yum?

Thursday, October 25, 2012

Acorns for Halloween

Here's a fun DIY Halloween craft to make from acorns.

First, take off the tops and coat the nut with ModPodge.
Let dry and apply a second coat.

Next, paint them orange.
They already look like pumpkins!!

With a fine tipped brush, paint little Jack o Lantern faces on them.
OMGHOWCUTEISTHAT!!!!???
You could plant them all over the house, or dress up a dollhouse for Halloween, or put a bunch of them on display in a bowl...

Meanwhile, I will be carving my very first ever jack o lantern. GAH!! I'm so excited....:D
Happy Halloween all!

Tuesday, October 23, 2012

Apple Cider Pancakes/ Waffles

Oh man, you're gonna love these! You can do them as pancakes or you can pour the batter onto a waffle iron and make them waffles! It works, I tried it :)
They smell so good when they are cooking.
Apple Cider Pancakes

1cp flour
1/2cp old fashioned oats
2tsp baking powder
3TBS brown sugar
1tsp cinnamon
1tsp nutmeg
1 egg
1cp apple cider
1 tsp vanilla extract

Whisk the dry ingredients (flour through nutmeg).
Add the rest of the ingredients and stir until just combined.
Heat frying pan or griddle and melt some butter or no stick spray.
Pour 1/4cp (more or less) of batter on pan and fry until bubbles appear.
Flip and cook a minute more.

I had some left over cider frosting from a cake I made last week so I put a slab of that on top when serving- good stuff!

For the frosting, I followed the recipe here: http://www.ahintofhoney.com/2009/10/caramel-apple-layer-cake-with-apple.html
Of course, if you're just wanting some for the pancakes, reduce the recipe by A LOT!

Thursday, October 11, 2012

Apple Pie Cupcakes

Here it is, the post you've been waiting for: The Perfect Fall Post (in cupcake form). Pictures to come- I left my camera at work, OOps!

These were so awesome! I saw a recipe online for a similar cupcake but I didn't like the cupcake recipe (HOW MANY sticks of butter?!?!?!) So I came up with my own version with less butter and more fluffiness..

Here's what you need:
Apple Topping: 2TBS butter, 1/4 cp sugar, 2 apples peeled, cored, sliced thin.

Cupcake:
1&1/4 cp flour
1&1/2 tsp baking powder
1tsp cinnamon
1/4 tsp salt
3/4 cp sugar
6TBS (3/4 stick) butter
1 egg + 1 egg white
1tsp lemon extract or lemon juice
1tsp vanilla
1/2 cp milk

Frosting:
1/2 can of store bought cream cheese frosting
cinnamon to taste

Melt the butter in a frying pan over low-medium heat and stir in the sugar until dissolved. Add the apple slices and fry until the apples are lightly carmelized and soft (7-8 min) Remove from heat and set aside.

Preheat oven to 350 F

Whisk the flour, baking powder, cinnamon and salt together in a medium bowl.

Beat the butter and sugar in a large bowl until fluffy. Add eggs, lemon, and vanilla and beat until well blended.

Add the flour mixture and milk. Beat on med/high speed just until all the flour is mixed in. Do not over mix.

Put cupcake liners in  cupcake pan and fill each one 3/4 of the way with batter. Top with apple slices. Bake 18-20 min. or until golden brown and the cake bounces back when touched.

Cool in pan 5 min. and then on wire rack. *Cupcakes must be completely cooled before frosting or the frosting will melt- you don't want that!


I totally cheated on the frosting and bought a can of cream cheese frosting that I stirred cinnamon into before frosting the cupcakes.

Enjoy with a nice warm mug of cider next to a warm fire.

Friday, September 21, 2012

Fall Campfires and S'mores Pancakes!

Fall has arrived early this year (so sad, I miss summer!) and what would be more awesome for breakfast than S'mores Pancakes?!?
Plus, I just got back from Hershey, PA. so we've got chocolate on the brain..

Ingredients:
 1 cp flour
2tsp baking powder
2TBS cocoa powder
2TBS brown sugar
3/4cp milk
1 egg
for topping: 1cp marshmallow fluff +2TBS boiling water- stir until combined.

Whisk the dry ingredients in a large bowl.
Beat the wet ingredients together in a smaller bowl then add to the dry ingredients and stir to combine.
 
Spoon a quarter cup of batter onto a skillet (or griddle, if you have one) on medium heat that has been coated with nonstick cooking spray/butter (mine is no stick, YAY!). Flip after 3-4 minutes, just as you notice bubbles forming around the edges of each pancake, and cook 2 minutes more.

Drizzle the sauce over the top. If you're really wanting chocolate, stick a piece of chocolate on top of the pancake before the marshmallow sauce...just sayin'


Monday, September 10, 2012

The Craft Room Begins


I'm so excited because last week I picked up this beautiful old chair for $10!
Reupholstery and wood finishing are new subjects for me but I think this will be a fun adventure.
Any suggestions on color schemes? I plan to paint the wood a nice fresh color and of course new fabric for the seat cushions.


The chair will be part of my craft room! We are going to be converting his old workroom into craft central!!! I can't believe he's giving me his tool room-

This is the before pic- YIKES!
The chandelier, green shelf and chair are my additions so far but we have to get those "man things" out of the way first!

I am going to have so much fun in here!
Also went to the art museum this weekend and saw 3 Monet paintings in person. This was my favorite of the three. There was a Tiffany's glass exhibit too. WAHOO!


Friday, August 31, 2012

DIY Mint Skinny Jeans

As I was bumbling around on Pinterest this week, I discovered this fabulous idea from the girls at PrettyProvidence!
These colorful skinny jeans have been so popular this year!Now, you can get the look without shelling out gobs of cash. Sweet!
Here's the link to their how to:  
http://www.prettyprovidence.com/2012/04/style-for-song-diy-mint-jeans.html 
They even show you how to make regular jeans into skinny ones!

Tuesday, August 21, 2012

Freebie Alert!

Check it out! Free samples of Simply U shampoo! Go here to claim yours now while supplies last! 

Wednesday, August 15, 2012

Delicious 3 Ingredient Breakfast Pinwheels

You're gonna want to make these for breakfast ASAP! They're so good the man was enthusiastically asking for seconds.
How many ingredients, you ask? Only 3, yep, you heard me right, 3 ingredients!

1 roll of breakfast sausage
1 (8oz) package cream cheese, soft
1 tube crescent dough

Brown the sausage in a frying pan and drain off the excess grease.
Combine sausage with cream cheese in a large bowl.

Open crescent dough and lay out in a rectangle( do not separate the sections). Roll out a little and seal up the sections seams so it is one big rectangle of dough.

Spread the sausage mixture on the dough and roll up length wise.
Stick the roll in the freezer to firm up for a bit (15-20min?) before slicing across the roll to make lots of pinwheels.
Bake at 350 F for 15 min.
Done!

Eat them plain or dip them in syrup. They are good either way!

Wednesday, August 8, 2012

Wildly 80s T-Shirt Refashion on Whip It Up Wednesday!

Here's my fabulous T shirt's before picture. Gotta love that color!

The first cut is made. Cut off the top to make a sccop neck.

Cut the bottom hem of the shirt off and use to make straps. Just cut the straps 2 inches longer than you need them to  be.

Pin them on in place and try it on to make sure you like the length and placement of the straps.
I made one shorter than the other so it would hang at an angle.
Last step is to sew the straps in place using the extra inch  on each end of the strap as the part you sew.

Enjoy!

Thursday, August 2, 2012

DIY: Recycle Junk Mail!

As you all know by now, I love finding ways to recycle, reduse, reuse!

So this week I am bringing you a quick, easy way to dress up your mail while recycling the extra junk mail envelopes that come in your bills, credit card offers, etc.

It's a perfectly good, useful envelope other than all the stuff printed on it!

I use mine to mail smaller items when I sell things in my online store so I make sure to put my blog info on there too!

These can also be used for personal mail. Guess what, people love getting personal letters.
I like the "tag you're it" image I found in a magazine because it's a cute way to say " hey! write me back!" :D

This is such an easy project but I bet you hadn't thought of it!
Find nice images or patterns in magazines or other junk mail that will cover the spots on the envelopes that have writing/print on them and glue them on! Use markers, stickers, glitter, paint, etc to make the envelope your own!

Wednesday, July 25, 2012

Vintage Dress Restoration Project-Success!

The much anticipated pictures of my dress project have arrived!
I wanted to wear this to a dance later this week so I had a motivation to get to work on it and not let it languish in my sewing to do box..
The pictures of the finished dress and story of how I found it are below too!

The supports through the bodice were poking through their casings and the fabric was shredded in places.

I found some scrap fabric that was tough and canvas like -may have been the seat of an old folding chair. This was what I used to make a new casing for the supports. It was slow going and all done by hand, being careful not to go through to the front of the dress and avoiding the fraying areas.

There were also several seams where the mesh/lace like fabric on the outside was coming out of the seam and fraying.

I was able to fold them under and sew them back into the seams with the help of my bottle of permanent fabric glue to keep the fabric from fraying/disintegrating in my hands while I sewed it in.

Here it is!

and you probably want to know the story of this beauty.

Well, I found it on Craigslist believe it or not. A lady was having a yardsale for her stockpile of vintage treasures she had accumulated over the years from estate sales. I asked if I could come take a look at the clothes and, among other things, came out with this authentic vintage 1950s/60s dress!

What a find!

Thursday, July 19, 2012

I am...

I was inspired by Cortney at www.themommyhoodproject.com blog to write an "I am.." list.
I will inject it with pictures of Gaston to spice it up a little, hehehe!
First and foremost,
I am ...momma to little Gaston. OoO look at that little tongue peeking out! {yes, I am cooing over all his sweet pictures right now, like any good momma would}

 I am ...wearing a pair of size 00/0 jeans that I found for $.99 at the thrift store this morning and I still can hardly believe that I fit into!!! This is very exciting!

I am ...definitely silly and cheerful.

I am ..a lover of all things vintage especially 1920s-1960s

I am ..restoring an old dress from the 1950s-60s era that you will be seeing pictures of soon!
and
I am... currently embroidering a pair of old jeans, which you will also be seeing but I don't know about the soon part cuz it's definitely time consuming. lol

I am ...strong and healthy.

I am...creative and frugal, which, when combined, can turn out some wicked cool stuff!

I am.. enjoying the summer!

I am..looking for my next good read but not sure what it will be yet. Just finished reading a bio on George Jaques Danton-Giant of the French Revolution. Any suggestions?

SO...What are you?

If you post an "I am.." list, post the link in a comment or link back to mine so I can check it out!


Monday, July 16, 2012

American Pin up girls and Vintage Planes

I went to an airshow and USO hangar dance last weekend and had a great time! There were some great photo opportunities that I snatched right up too :)

Don't these fellas look like they came out of a time machine?

We talked with them for awhile and it was nice to see that kids so young are so knowledgeable and interested in our history. They have both been involved with reenactments since childhood!

They even did a parachute drop! Can you imagine dropping out of a plane?

There were so many vintage planes there. This is the location of the project I blogged about previously where they are working to build a memorial to Leland Pennington the local Tuskegee Airman killed in WWII.
Check out that post here if you want to learn more: Keep Em Flying

All the parachutists wanted their picture taken with Richard "Red" Falvey an actual veteran of the 101st airborne paratroopers of WWII(aka Band of Brothers).

You can see Red in the light blue jumpsuit. He is in his 90s and sharp as a tack! I am so glad I had the chance to meet him while he is still living. What an honor!

and we got to see the Memphis Belle (the one they used in the movie "Memphis Belle") before she goes on tour.

but of course we had to get some good photos in before she leaves us.

My friends and I came all dressed up for the hangar dance after the airshow.

Perfect.

Related Posts Plugin for WordPress, Blogger...